(Version w/head support)
~.:Haku:.~
Materials:
- Yarn: (all are regular worsted medium) Soft White, Pale Green (mane), a pale grey (underbelly), pale pink (feet and nose), lime green (iris), dark green (iris shade), pale gold (horns), and black (eyelid and pupil)
- Hook: Size G (I use it for all of my projects)
- Stuffing
- 8 mini Popsicle sticks
- washable marker (optional but helpful)
Stitch Chart:
Ch= Chain
Sc= Single Stitch (Single Crochet)
Dc= Double Crochet
Sl St= Slip Stitch
F/O= Finish Off
.:~*Creating Haku*~:.
Head and Body:
(As you know, Haku is mostly body length. His head isn't bigger than the rest of his body, so we'll start at his snout and end at his tail in this part)
With White, ch 2
sc 8
Rnds 1-4: Sc around (put a place marker in)
Rnd 5: sc 1, 2sc
Stop and get grey.
Attach it to where you want the top of the snout to be (mine is lined up with the place marker at the very end of the snout).
Sc across the top once, then turn and follow the row up to Rnd 5 or one ch before.
When doing the second row, hook the working string through the previous chs as well to pull them down. This way, they're not sticking up and look out of place.
Sc the rest of the way parallel to the first row until the end.
F/o and leave a long string.
With that, go back and, just like you did in the previous row, sew down the chs so they don't stand up. Tuck in strings.
Now for the nose.
With pink, skip down the sting (So you'll have a long end to sew on the nose from both sides) and ch 3. Place nose where you want it and pull strings through side loops. Now take the ends and pull them through the ch closest to the middle of the snout. This gives the nose a little body. Pull the strings through the center ring you started with (the sc 8 center).
Now it looks like a cat nose, which is very smiliar to his =)
stuff snout
Return to the white
Rnd 6-9: sc around
Stop for eye (make 2)
W/lime green, ch5
attach darker green and sc across top
F/O
with black, Ch 2 and attach to middle of eye.
Attach eyes to head (use washable marker to mark where you want your eyes).
Secure to head then cut a long black string for the eyelid. Only pull it over the top of the eye. You may need to overlay the black a few times so make sure the string is long enough. =)
stuff
Forget the Whiskers? Why yes, yes I did! xP
But I've fixed him now..
For the whiskers, simply attach a long strand of yarn to either side of the snout.
back to white
Rnd 10-13: sc around
stuff
Rnd 14-17: sc around
stuff
Rnd 18-21: sc around
stuff
Rnd 22-25:
stuff
Rnd 26-29: sc around
stuff
Rnd 30-33: sc around
stuff
Rnd 34-37: sc around
stuff
Rnd 38-41: sc around
stuff
Rnd 42-45: sc around
stuff
Rnd 46-49: sc around
stuff
Rnd 50-53
stuff
Rnd 54-57: sc around
stuff
Rnd 58-60:sc around
stuff
Rnd 61-64: sc around
stuff
Rnd 65: sc2tog, sc rest
Rnd 66-68: sc around
Rnd 69: sc2tog, sc rest
Rnd 70-71: sc around
Rnd 72: sc2tog, sc rest
Rnd 73-74: sc around
Rnd 75: sc2tog, sc around
Rnd 76: sc around
Rnd 77: sc2tog, sc rest
Rnd 78: sc around
Rnd 79: sc2tog sc rest
sew hole closed
F/o
Face fur:
W/ white:
attach fur around his jawline, which is one row behind the eyes
attach it along underneath the jaw and to the other side
make sure they're aligned on both sides.
How to attach fur (yarn) ?:
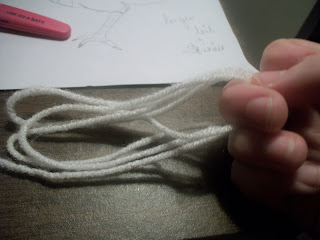
Loop the yarn around each finger except for the thumb on one hand (kinda like cat's cradle)
Line the loops up:
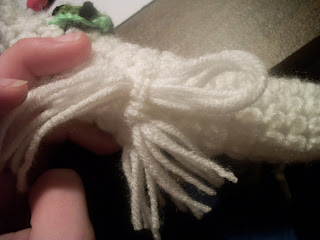
Pull loop end through desired ch:
Now, pull the other end through the loop to make a knot. Pull it tight.
Cut the ends and voila! Fur =)
Mane:
With Pale Green, go along his (imaginary) spine and add his mane.
The beginning fur should start on the row behind his eyes.
It doesn't reach all the way to his tail tip, so leave some space.
I left about 15 rows between the tail and the body mane.
For the tail, Make sure the piece of fur you add to the center is the longest piece so that when you add the other fur around it, it appears triangular like Haku's.
Underbelly:
With pale grey, sc down his belly (like you did the snout) until you reach the row where you ended the mane.
Sc back up the belly (remember to sc through the first row as well to pull it down) and F/O where you started, leaving a long tail.
Weave the string through the 2nd row of sc to pull those down for a flat underbelly.
See how it sticks up?
See how it becomes flat?
Front leg (2):
ch 2
sc 6 in 2nd ch
Rnd 1: sc1, 2sc in next
Rnd 2-4: sc around
stuff
add popsicle stick
Rnd 5-7: sc around
stuff
Rnd 8-9:sc around
stuff
with pale pink, Rnd 10-11: sc around
bend the area where the elbow would be and tie the inner crease (with white) to stay in place
be careful not to let the popsicle poke out
Rnd 12:sc around
stuff
then add second popsicle
Rnd 13-14: sc around
stuff a little
Rnd 14-15:sc around
Rnd 16: sc 2tog around
sew hole closed
Popsicles look like this inside the leg:
feet (2 per leg):
With pale pink:
ch 2
sc 5 then sc tail
Note: sc tail uses the tail rather than working string:
f/o and add to bottom of leg
use tail yarn to secure it onto the leg, other end to weave through chs to secure as well
toes (3 per foot):
With pale pink:
ch 6
sc across those 6
F/O and attach to foot
to point them straight out, attach them normally then attach the with the string on either side of the toe to the base foot. This pulls the yarn (but not too noticeably) to make it stand straight.
Ears (2):
With white:
ch 7
sl st, sl st, sc, dc, dc, dc
the above looks best as the left ear on Haku (well, his right) and if you want the other ear to look opposite (doesn't really matter but I am a bit picky about that) just take the above sequence after ch 7 and reverse the order. You probably won't get the last sl st (I didn't :/) so I just took the end piece and tied a tiny knot, then left a long tail from the working ch. Doing that, I pulled the end through the other chs (preferably down the middle) so that I could get the string to the other end to sew onto the head. Going through the other chs hides the fact that it was on the other end. For the other end, just pull it through the chs as best as you can, since it probably won't meet the head end.
Horns:
With pale gold:
ch 2
Rnd 1:sc 4 in 2nd loop
Rnd 2-5: sc around
Rnd 6: sc2tog around (it'll only go 2 times)
ch 2
sc down through the one ch
f/o weave tail through ch to bottom
To Pull Haku's Head Up Straight:
Not really necessary unless you plan to have him standing a lot
If you don't plan on having him stand, I'd suggest tying his legs upward so that he looks like he's flying =)
Example (Note: he's not finished in this pic):
Anyway:
This is a matter of balance for Haku
Tie one long strand of white yarn to either side of his neck right beside his shoulder.
With that, weave the strings through two rows on either side of his neck then pull them back to the starting knot.
Tie another knot
As you do this, you will see his head and neck lift in response to the string pulling him. It may take a few times of repeating this step and moving up a few rows, but it's pretty easy.
Don't stop until he is able to stand up with his neck up
(NOTE: HE WON'T DO THIS PERFECTLY. His feet are unable to fully support him at EVERY angle, but he will be able to stand up with proper adjustment. It's something you have to play around with)
If you plan on having his neck straight, also have his head tucked downward some. It looks weird to just stand straight up with the neck.
Attach a string just like with the neck and weave it under Haku's jaw to pull it down.
Voila!! You have your own Haku~!! Yaaay~!! =33
lol notice my army in the back?
Haku is from Spirited Away and is copyright of Hayao Miyazaki.
This is a free pattern and is in no way to be sold or redistributed.
Thank you. =)


Thanks for posting the pattern for Haku. All your crocheted anime characters look awesome :D
ReplyDelete