Thursday, December 22, 2011

~Auron Amigurumi~

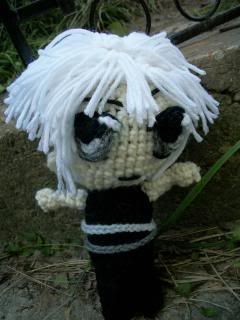
A Final Fantasy 10 'Rumi has appeared~!! =)


.:~*Auron*~:.

SPECIAL THANKS GOES TO SAIJAY AND ROB @ http://kandjdolls.blogspot.com/
The body pattern for this amigurumi comes from one of their patterns (the adorable Pink Little Lady)
and they have kindly posted the original body pattern on their blog to use with these doll designs. =) Thank you again!!


Order of Importance:
*Check Color Chart
*Legs and Rnds 1-18
*Eyes (Shades) and eyebrows
*Ears
*Finish Head
*Collar
*First arm (kept inside kimono)
*Kimono
*Belt
*Other arm (free one)
*Sleeves
*Shoulder guard
*Belts on collar
*Sew collar so that it's close enough to not see mouth or nose
*Hair
*Sword (optional)

Body Pattern:

Color Chart:
-Legs: Rnds 1-5: Black
Rnds 6-8: Dark Grey
-Body: Rnds 1-10: Dark Grey
11-23: Skin
-Eyes (Shades): Black
-Arms: Skin
-Kimono: Dark Red (lost name for the one I used) and Navy Blue
-Belt: White and Light Blue
-Belt, Shoulder Guard, and Collar Belts: Brown
-Shoulder Guard Designs: Bright Orange ( the real color is supposed to be yellow but I was out and it won't make a drastic difference)
-Hair: Black and Light Grey
-Sword: White and Silver

~Creating Auron~

Auron is very time consuming so be warned....

Eyes (2):
w/black
Mark your spots with a washable marker. This helps very much in getting his shades just right.
As you can see, I put mine a little lop-sided haha, but it gave him a nice pose in the end. =)
Stop at Rnd 18 
We rarely see his eyes so there's no point in making them unless you just absolutely have to.
Ch 2 and leave long tail
sc 8 then sc tail (treat tail as regular working yarn). You have 9 sc now
sc around then sl st into first.
F/O
Frames: w/black ch 5
attach to one shade just above where you finished off
sc 5 
ch 3
attach to other shade above tail
sc 5
ch 5
F/O
Sew to head


Eyebrows:
Take some black yarn and attach them in his usual "angry", slanted style.

Ears:
W/skin color ch 6
hdc 3, sc 2, then sl st.
 F/O and attach to the head on the row below the eyelid line.
 I put them about 3 ch rows from each eye. Attach the ears on both sides.
Put them right under the shade frames.


Collar:
w/dark grey
sc backloops of Rnd 10 (where skin color starts)
*sc 1, then 2 sc in next* around
sc around
*Sc 2, 2 sc in next*
sc around, sl st in next
F/O

~Finish crocheting the head now~

Crochet one arm and attach it to the body sideways.
This is the one he always keeps above the belt.


Kimono: 
w/dark red
ch 26
Dc 8 rows 
(Mine is 7 rows but I found that I really needed 8 to work easily)
Attach Navy Blue and sc up both ends. Don't Sc around the whole thing.

Belt:
w/white
ch 40
sc across
Attach Light Blue
sc across
Attach white again
sc across
F/O

Wrap Auron in his kimono and tie the belt around him as tight as you can.
You want to make sure the belt will hold the kimono in place no matter what.
(Note: the shoulder guard in the pic is NOT supposed to be there yet. It was a test run.)

Buckle: w/ Brown ch 6
sc 3 rows across
F/O and add to front

Attach Kimono w/ red yarn at top around collar

Crochet other arm and attach to kimono.

Sleeves (2):
w/dark red
ch 14
Dc 5 rows
F/O
 Add both  and angle the one without an arm so that it looks like it's just hanging there.

Shoulder Guard:
w/brown
Ch 2
sc 7 and sc tail
*1 sc, 2sc in next*
*sc 2, 2 sc in next*
Sl St
Designs:
w/ bright orange, randomly sew on strands to look like his pattern.
The design doesn't go farther than the rim of the guard so don't let it hit the center.
Fun Idea: Sew on your name here~!! =) 
Attach to robe above the limp sleeve.

 Collar Belts:
w/brown
Long one: ch 50 and sew on
this one goes almost completely around but not all the way
Short one: ch 30
Goes right in the middle a row or two below long one
Vertical one: ch 5
Goes right down the middle of both.

Note: The long belt goes on top and the short one goes below it. On mine, I accidentally sewed them on backwards (while sitting there looking at the picture the whole time @.@)
So don't go by my picture on this one! xD

Hair:
(Finally, right?)
Get your hand dandy washable marker and mark his hairline.
He has 3 noticeable grey spots. (peak, and one on either side of head)
When doing the hairline, make sure that the line is all black except for the peak, which should be grey.
Put the other two grey spots behind the first row of black.

Pat his Hair back and cut it short.
The grey peak partially falls down so take a few strands and make that effect.

Sword: 
W/ Grey: ch 28
sc across
W/ white: 
tc (treble crochet) 10 times, dc 10, 5 hdc, 3 sc, ch 1
F/O

~And Finally, Auron's Done!!~
PHEW....
Sorry, Don't have a lot of pics for this one!! 

I hope you enjoy him and thanks for visiting~! =) Please do not repost this pattern or Sayjai's pattern without permission.  This pattern is for free use and not to be sold anywhere


Tuesday, December 20, 2011

~Ponyo Amigurumi~

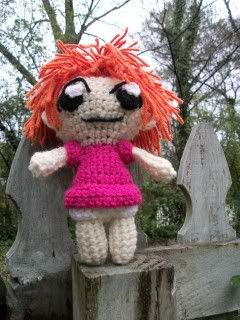
Ponyo, ponyo~ ponyo ponyo~! Made as a Christmas present for a friend (because they went nuts over the movie and kept begging me to play it over and over and over....) but now you can have this cute little mermaid-'Rumi for Christmas, too! =)


.:~*PONYO*~:.
 SPECIAL THANKS GOES TO SAIJAY AND ROB @ http://kandjdolls.blogspot.com/
The body pattern for this amigurumi comes from one of their patterns (the adorable Pink Little Lady)
and they have kindly posted the original body pattern on their blog to use with these doll designs. =) Thank you again!!

Order of Importance:
* Check Color Chart
*Crochet Legs and Rnds 1-18
*Add Eyes, eyebrows, and mouth
*Finish head
*Crochet her bloomers and dress
*Add arms and sleeves
*Add hair


Body Pattern:

Color Chart:
-Legs: Skin Color
-Rnds 1-3: Skin Color
-Rnds 5-10: Medium Pink
-Rnds 11-23: Skin Color
-Arms: Skin Color
-Sleeves: Medium Pink
-Hair: Orange

~Creating Ponyo~

Eyes (2):
Start at Rnd 18 for her eyes
Hint: Use a washable marker to mark where to place eyes and mouth
-W/Black:
ch 2 and leave a long tail
sc 7 and sc tail (take the tail and treat it like regular working yarn) into 2 ch from hook
F/O
Highlights: 
w/white
ch 2 w/long tail
sc 6 and then sc tail 
F/O
Note: Sc tail closes the center hole so that it looks perfectly round. You may use another preferred technique if you wish as long as it gets the job done. This one works pretty good for me.

Eyelids:
 Hers go in an oval shape, so take a long black yarn strand and create that shape over her eye.
 Tie one end firmly (but don’t pull it out of shape!) inside the head so that it doesn't fall out of place. 
I tied the left corner. 
Now, you need a small string to tie the top to maintain the oval. You can use thin black string OR if you’re one of those people who a) doesn’t have black string at the moment b) it’s MIA or c) will creatively think of every possible solution to your problem so that you don’t have to move from your warm spot, then have no fear.
 Just cut a short piece of black yarn and pull it apart. Pull it until you have the thinnest strand and use that.
 The trick is to tie the string over the yarn through the same hole so that it won’t show
Voila!

Eyebrow:
W/Pale orange:
Cut a strand of yarn and place it over her eye, somewhat in an oval, too.

Ears:
w/Skin Color
ch 7
sc, hdc, dc,dc, hdc, sc
I usually attach the ears 3 rows back from each eye.

Bloomers:
(that's what I call them anyway)
Attach white yarn to the row just below Rnd 5 (where you worked the pink backloops)
dc around
when you're back to where you started, connect the bloomers through the legs so that it makes a diaper effect.

Sleeves:
W/ medium pink, ch 11
sc across 
sew on around the arms

Hair:
Ponyo's hair is curly and messy, which makes this pretty easy.
Attach her hair and cut it short enough to stick out randomly
Keep her hair short in the back.
Note: She has bangs that swoop to the right side of her face so be sure to add those as well.

~Ponyo is finished!!~

 I hope you enjoy him and thanks for visiting~! =) Please do not repost this pattern or Sayjai's pattern without permission.  This pattern is for free use and not to be sold anywhere

Thursday, December 15, 2011

~Hatsuharu Amigurumi~

Yup! Straight from Fruits Basket's cursed Sohma house, it's....

.:~*HATSUHARU SOHMA*~:.
SPECIAL THANKS GOES TO SAIJAY AND ROB @ http://kandjdolls.blogspot.com/
The body pattern for this amigurumi comes from one of their patterns (the adorable Pink Little Lady)
and they have kindly posted the original body pattern on their blog to use with these doll designs. =) Thank you again!!

Order of Importance:
*Check Color Chart
*Legs and Rnds 1-19
*Add eyes, eyebrows, and mouth
*Finish head
*Add ears
*Add Hair
*Crochet Arms
*Add Accessories 

Body Pattern:

Color Chart:
Legs and Rnds 1-10: Black
Rnds 11-23 and Arms: Skin color
Hair: Black and White
*Skip working the backloops on rnd 5*

~Creating Hatsuharu~
-Eyes:
Stop at Rnd 19 and start crocheting the eyes.
Helpful Hint: Mark spots for eyes and mouth with washable marker
-Colors: Gray, silver, black, and white

Iris: Ch 6 then sc tail
(to do this: pull tail through center ring and sc it like you would on a regular working chain)
Change to gray and sc around
F/O w/long tail for sewing
Pupil: ch 2, 
                   5 sc in ring, sc tail
Highlight: 
w/white Ch 7
Sew on the eyes where you marked. Make sure the whole pupil is sewn down. 
Take the highlights and pull one tail through a loop in the black pupil and the other tail just outside the iris. 
This gives him the "anime-eye" effect. =)

Eyelids:
This is very simple. Just cut four strands of yarn and sew them across the top and bottom of the eye. Voila!

-Eyebrows:
 Angle them slightly since Haru usually has a bored or pensive expression but keep them relatively straight.

-Mouth:
 Just a single string but very hard to get the right angle. Most of them look like they're smiling when I do it.

-Ears:
w/skin color ch 6
hdc 3, sc 2, then sl st in last st
F/O 
-FOR OPPOSITE EAR:
w/skin color
ch 6
 sl st, sc 2, hdc 3
F/O
I usually put them about 3 rows from the eye.


-Hair: 
White top w/ shaved black
- Make the hairlines with a washable marker.
 Sc on top of the line and then go down the next part until the area within is filled.
1 2 3 4
-For the white part: Simply add and cut. This is really fun.
The back part of the white hair needs to be almost a bowl cut.
For his bangs, have the ones on his forehead short and the ones next to them a little longer.
He has two long strands going down the side of his face below his ears.

-Arms: skin color only

-Earrings: 
Take silver string and tie through earlobes. Hide tails from view but don't cut them. They'll stick out.

-Belts: w/silver and dark grey
ch 29 and tie.

~Your Hatsuharu is complete~ =)
Hope you enjoy your new 'Rumi! =)
Please do not re-post this pattern or Sayjai's pattern anywhere without permission. This pattern is for free use only and is not to be sold anywhere.


Wednesday, December 14, 2011

~Shikamaru Amigurumi~

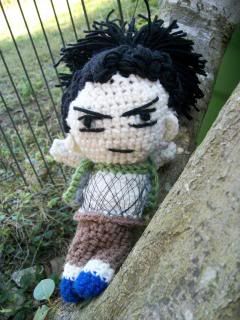
Hi everybody~!! =3 Time to introduce one of my favorite 'Rumi Roomies!! He is the laziest character from Naruto, a.k.a....
*drum roll*

.:*~Shikamaru Nara~*:.

SPECIAL THANKS GOES TO SAIJAY AND ROB @ http://kandjdolls.blogspot.com/
The body pattern for this amigurumi comes from one of their patterns (the adorable Pink Little Lady)
and they have kindly posted the original body pattern on their blog to use with these doll designs. =) Thank you again!!

Order of Importance:
*Check Color Chart
*Crochet Legs and Rnds 1-19
*Create eyes, eyebrows, and mouth
*Finish head
*Add ears
*Create Mesh Shirt (front part)
*Make Jacket and add on
*Finish Mesh Shirt (back)
*Crochet arms and sleeves
*Add hair

Body Pattern:

Color Chart for Body:
-Legs:
Rnds 1-3: Blue (Shoes)
Rnds 4-5: Skin (since his pants don't hit his ankles)
Rnds 6-8: Brown (pants)
-Body:
Rnds 1-3: Brown
Rnds 3-23: Skin color
*Skip working the back-loops, unless you just want him to have a belt*

Creating Shikamaru:

-Eyes: 
I usually stop to do the eyes on Rnd 19. I put a small piece of yarn in the working loop and close it so I don't accidentally undo the whole head (learned that the hard way).
Get a washable marker (recommended) and mark where you want the eyes placed so that they're in proportion  Place a mark for the mouth as well, but don't add a nose.
For the lazy eyes: Take a piece of long black yarn for the top of the eyelid on both sides.
-Pupil (2): 
w/black ch 3
Pull one tail through the space below the eyelid and pull the other tail through a space one ch below. This males his pupil. =) Refer to picture is you're not quite sure.

Now add the bottom eyelid. Make sure it doesn't touch the pupil.
Now that one eye is done, time to take care of any noticable marks from that marker. Take a slightly damp tissue and wipe it off. Don't let the yarn get really damp of course..

-Eyebrows:
For the "Angry Brows" Take a long piece of black yarn and place it so that one end is touching the eyelid point and the other is amost at the top of the last row you recently completed.
Add slanted mouth and finish the head crocheting the head.

-Ears: 
W/skin color ch 6
hdc 3, sc 2, then sl st.
 F/O and attach to the head on the row below the eyelid line.
 I put them about 3 ch rows from each eye. Attach the ears on both sides.

-For Earrings:
You won't be able to see them much, but hey they still count!
 Take silver string and tie through his earlobles. Hide the tails in the nearest opening.

-Mesh Shirt:
-W/ Green: Sc across Shika's chest just bleow the neckline (this is the top of his shirt). Don't have it right on the neck.
-With thin black string (or thin yarn) start diagonally sewing them across torso and navel area. Don't worry about going all the way around to the back because his jacket will cover most of it  You can come back and add the string wherever needed later.
-Once you're finished, sew the sring opposite of the previous ones to make the criss-cross pattern of the mesh..

-Jacket:
W/grey: Ch 16
sc across the top 7 times.
w/green: sc around the grey to outline it
Jacket + Sleeves
-Sleeves (2):
w/grey: ch 11
sc across top
w/green: sc around
F/O

*Hair*
Take your washable marker and outline his hairline. It makes life so much easier. =)
 Now take your black yarn and attach it according to your hairline. Make it long enough so that you can tie it back into his signature ponytail!!
Note: Don't go overboard with your hair. Too much of it will cause the head to droop and need support like my poor 'Rumi. =(

Your Shikamaru is now complete~!! =)

I hope you enjoy him and thanks for visiting~! =) Please do not repost this pattern or Sayjai's pattern without permission.  This pattern is for free use and not to be sold anywhere.